Tutorial at the end of THIS post!
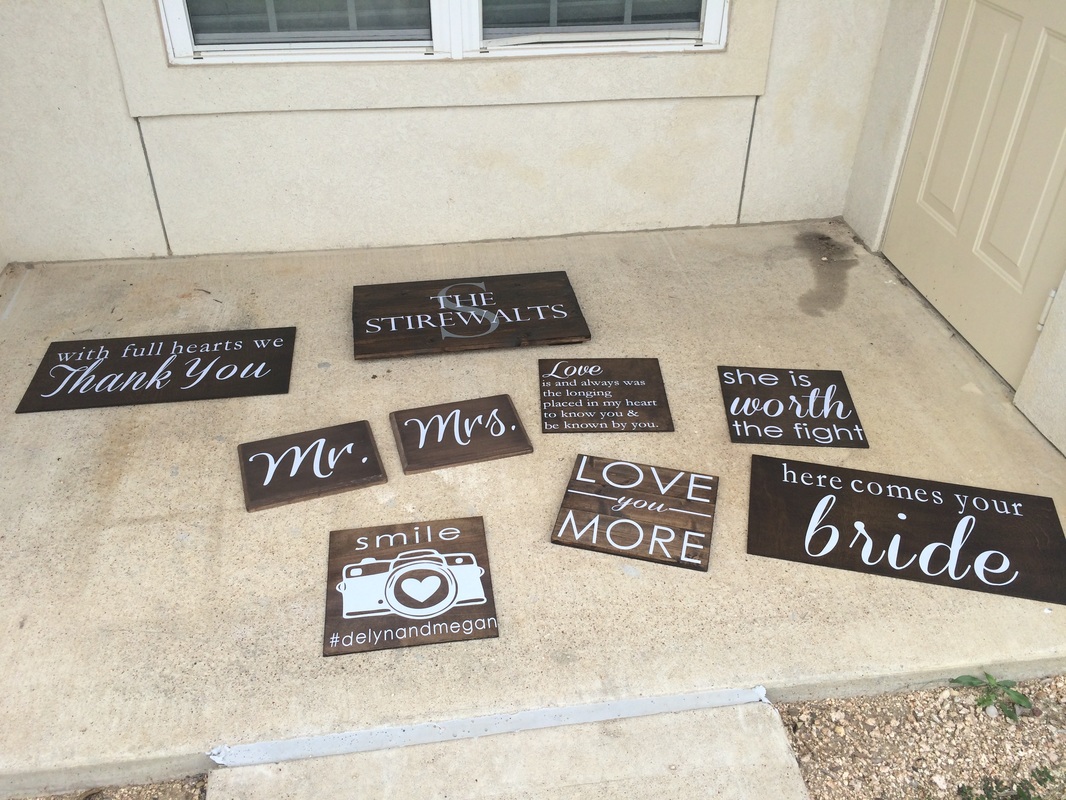
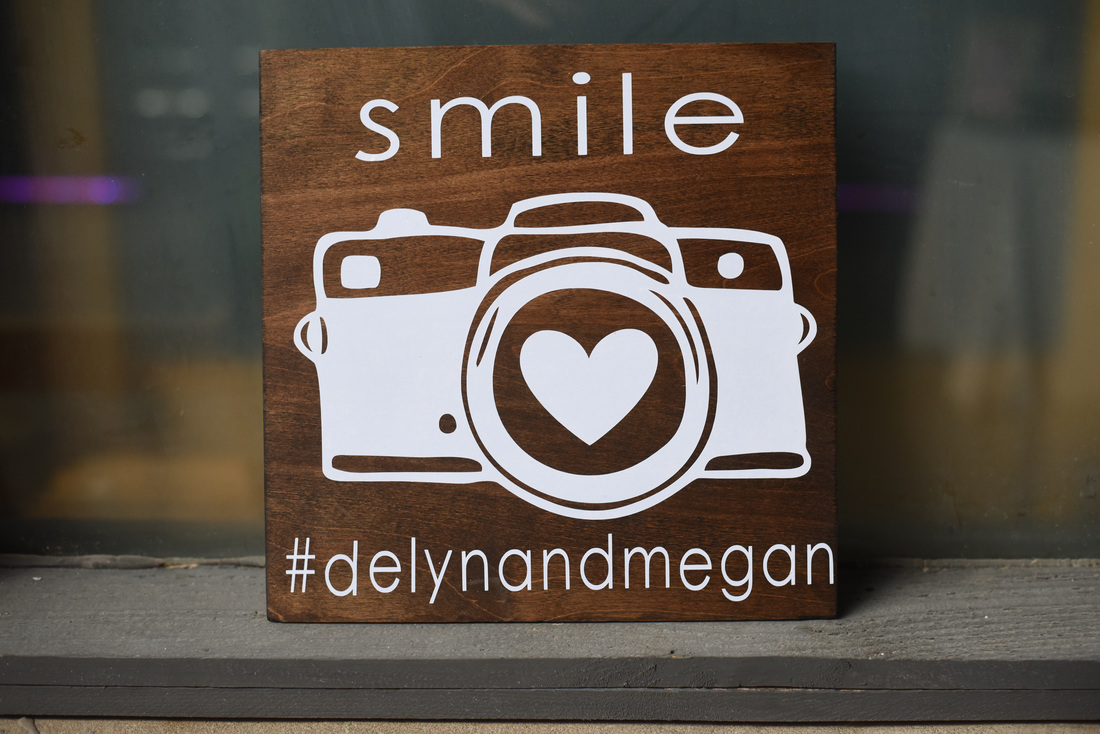
The first round of wedding signs I made; all are made from wood cut at Lowes (mostly 12x12" and 12x24"), stained, with white, vinyl adhesive cut from my Silhouette Cameo.
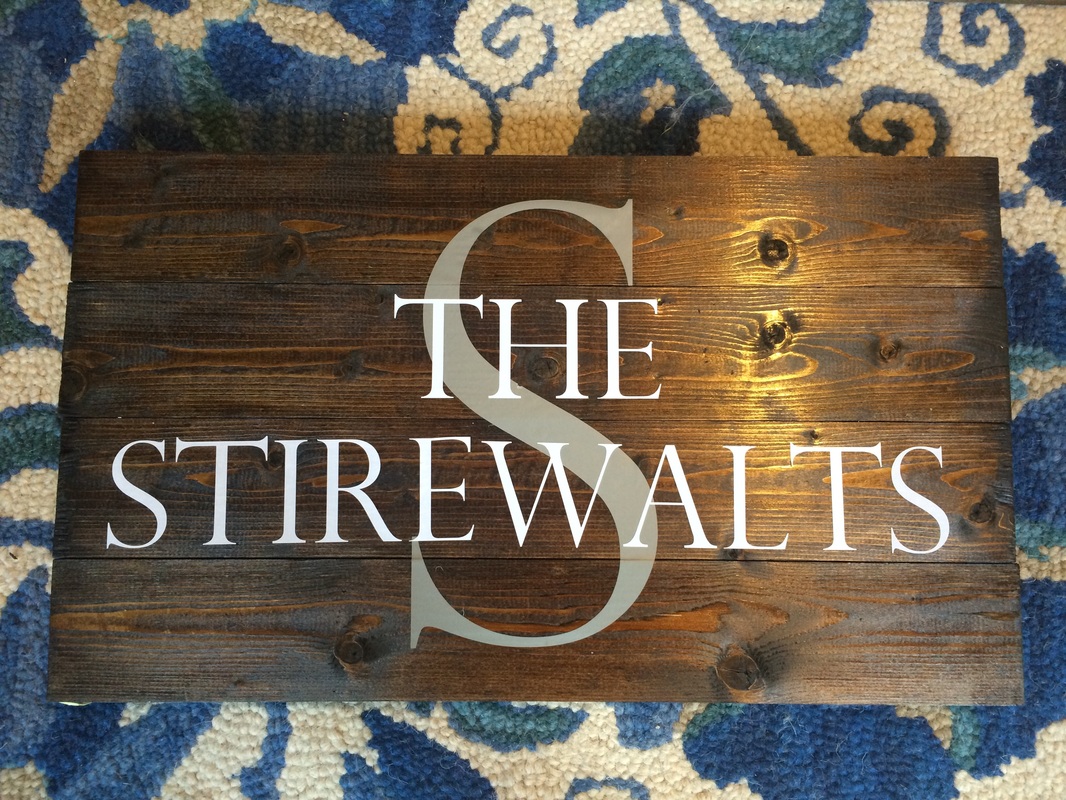
My favorite sign; the thicker pieces of wood take the stain beautifully. I originally used wood glue to connect the panels to support beams on the back, but ended up adding nails for support after a pre-wedding scare.
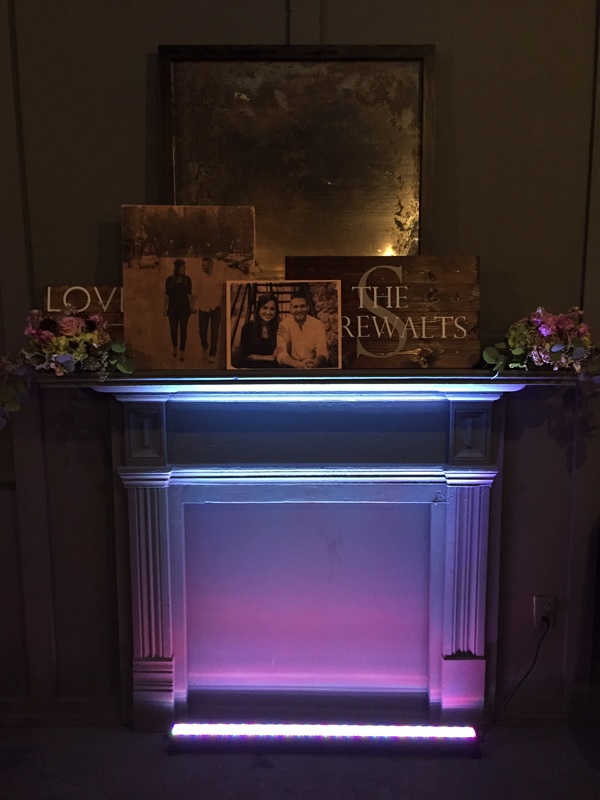
Two vinyl signs and two wood transfer signs. These were perfect sitting atop the mantle at our venue with some pretty florals and lighting to accent them.
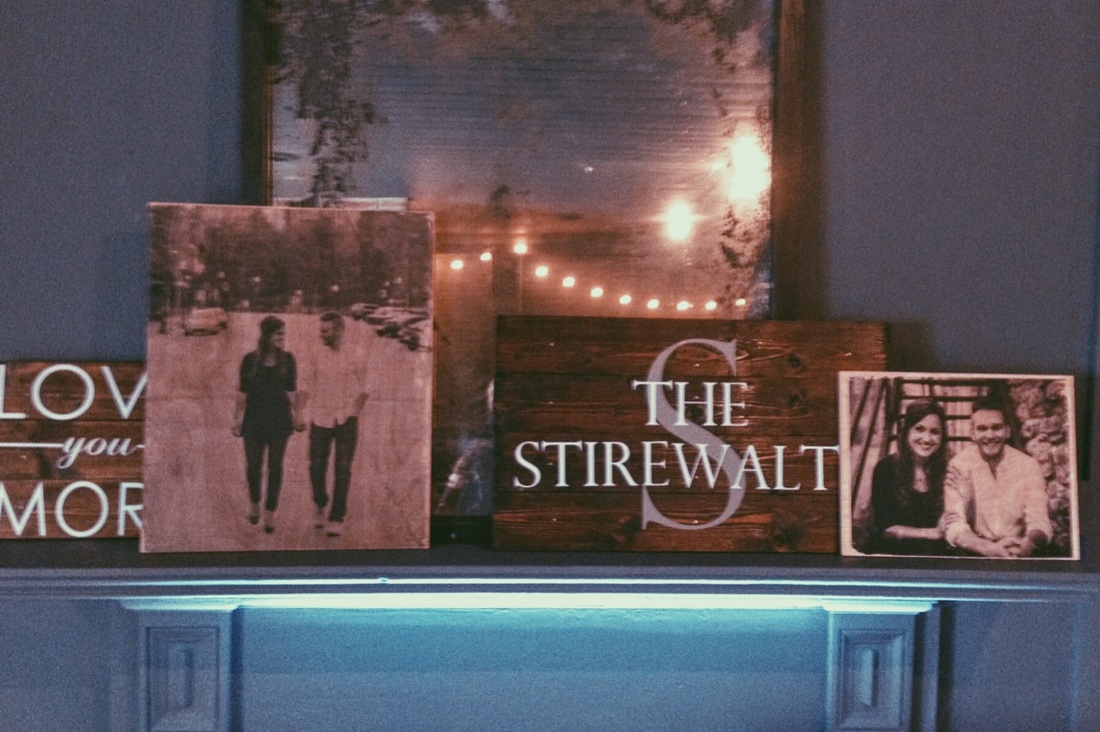
Zoomed in version
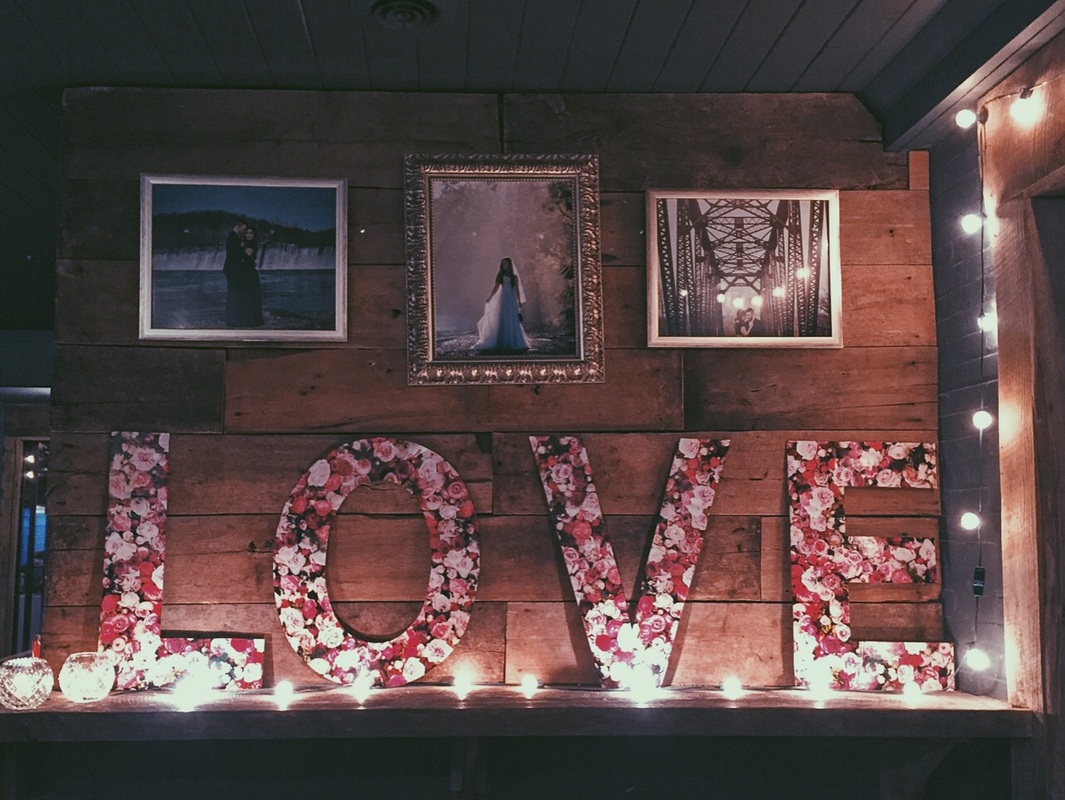
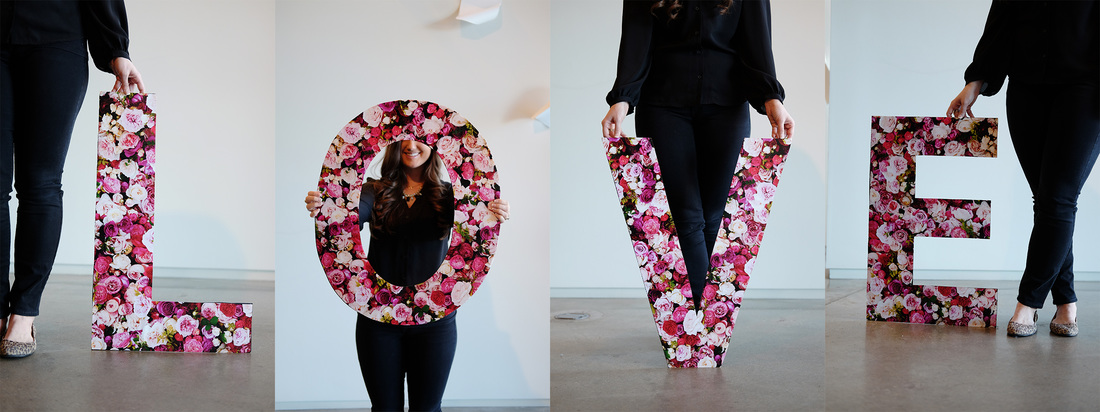
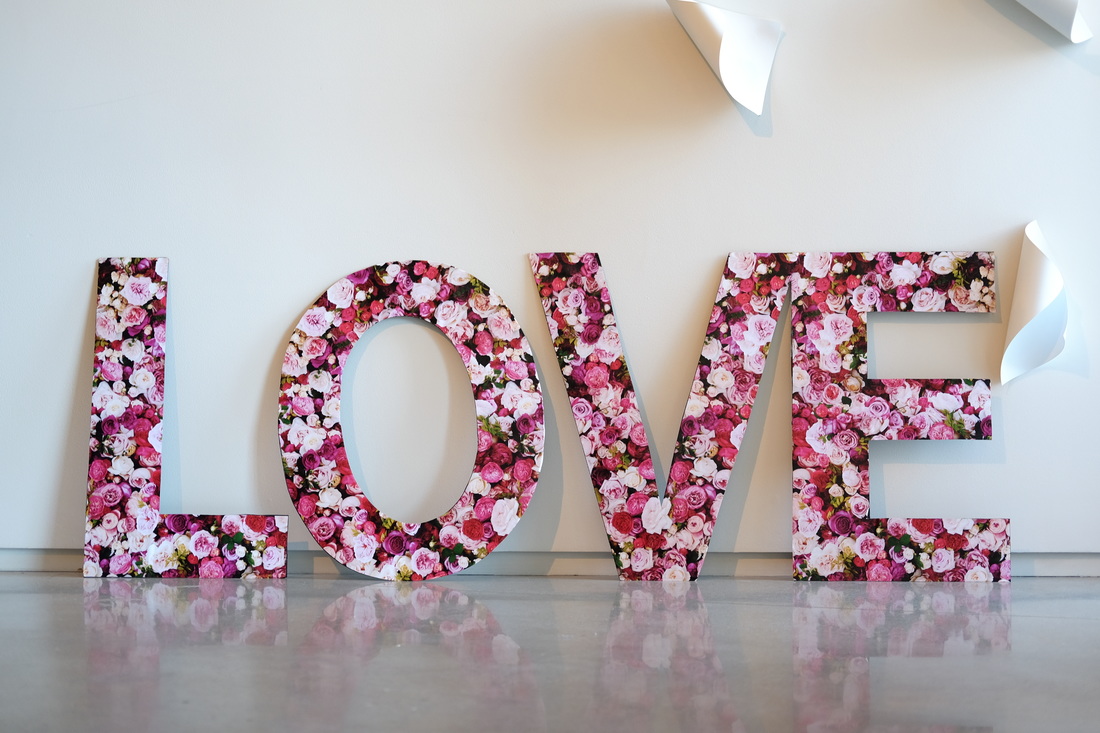
This LOVE sign was everything to me! Such a neat DIY project that I made because I wanted BIG, customized letters. Tutorial below!
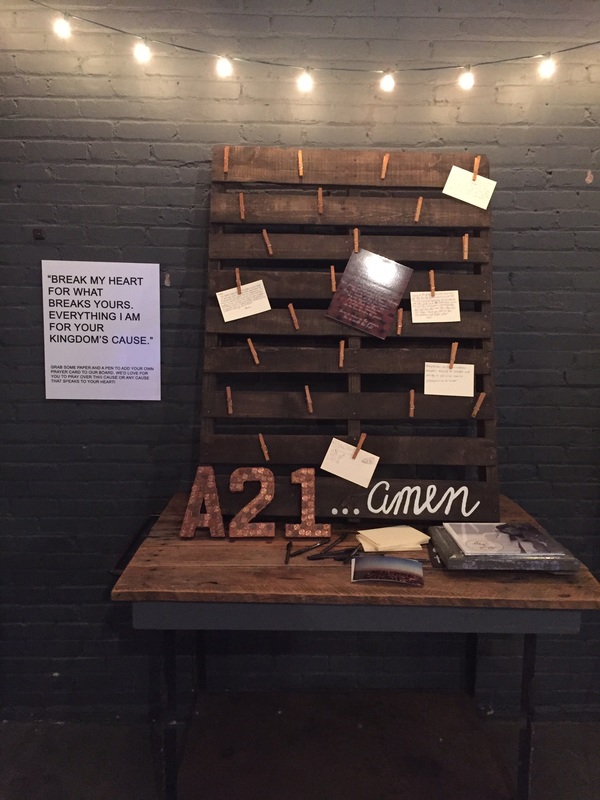
Our A21 spotlight: the prayer board was the perfect centerpiece to bring attention and interaction to the station. My friend, Chandler. sanded and stained this wood pallet!

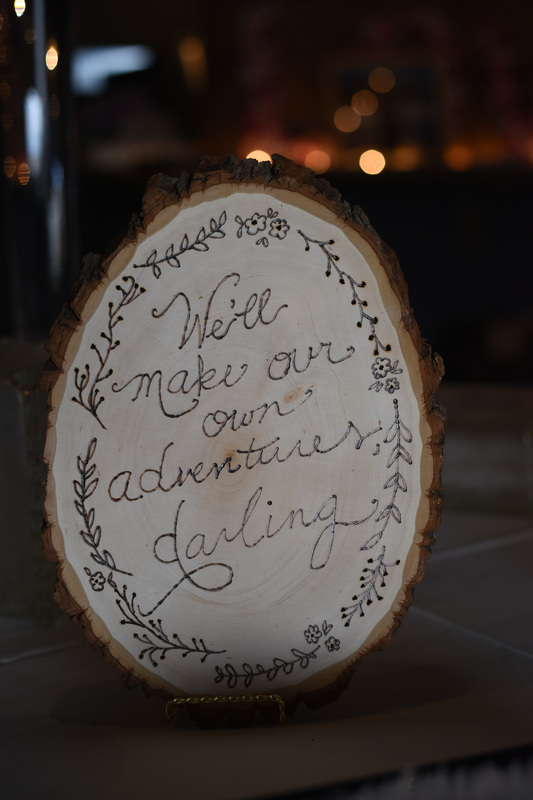
My sweet friend, Lindsay, made this awesome wood burned sign! This takes some talent!
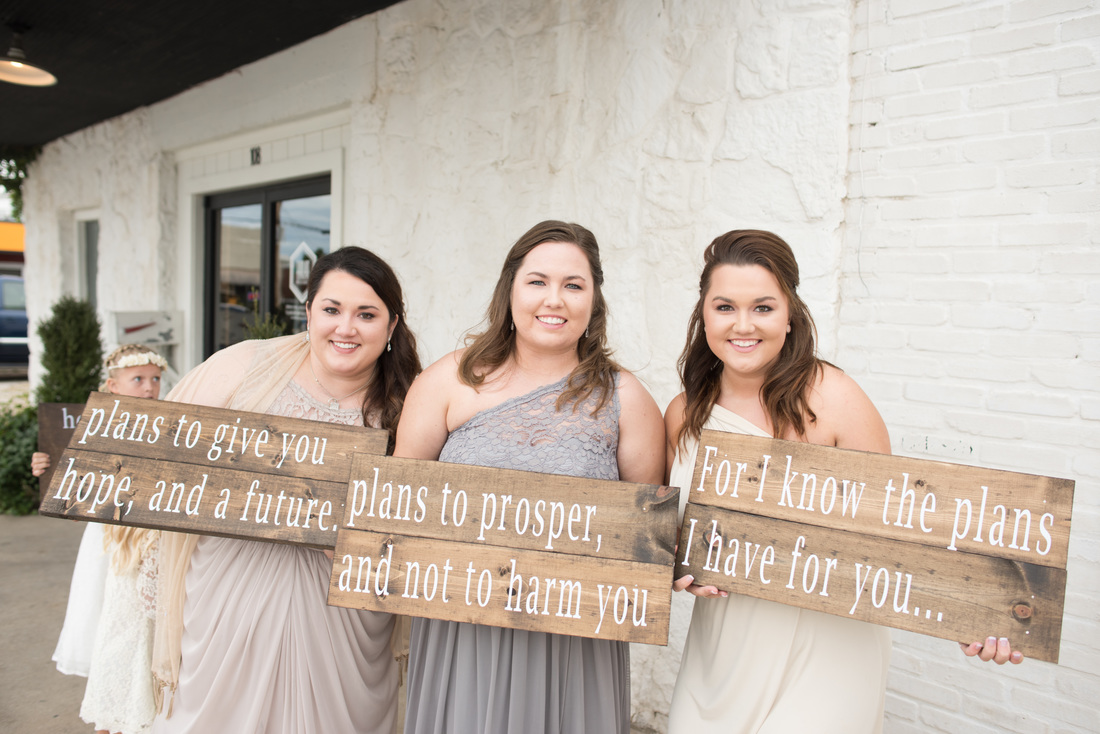
I can't pick a favorite project. But this was the most meaningful. I designed these signs for my sisters to carry down the aisle, from my dad's favorite scripture (Jeremiah 29:11). These signs are now hanging in our guest bedroom! Wedding crafts turned into home decor>>> WIN.
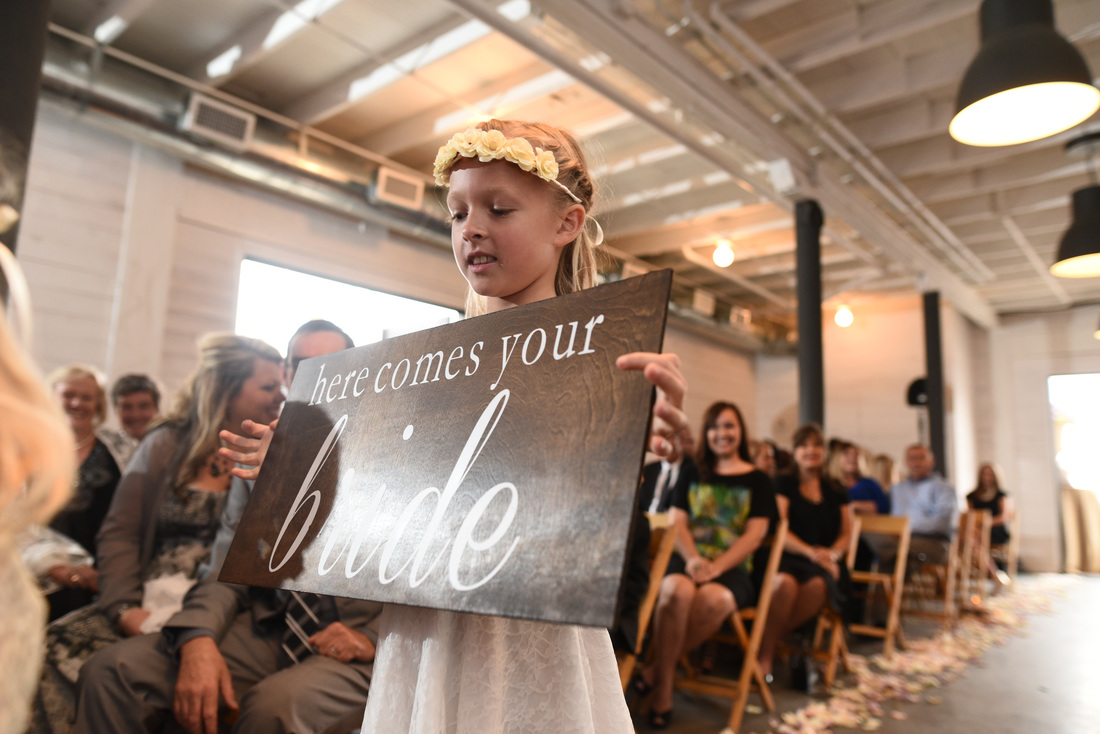
My pretty little flower girl carrying a special sign!
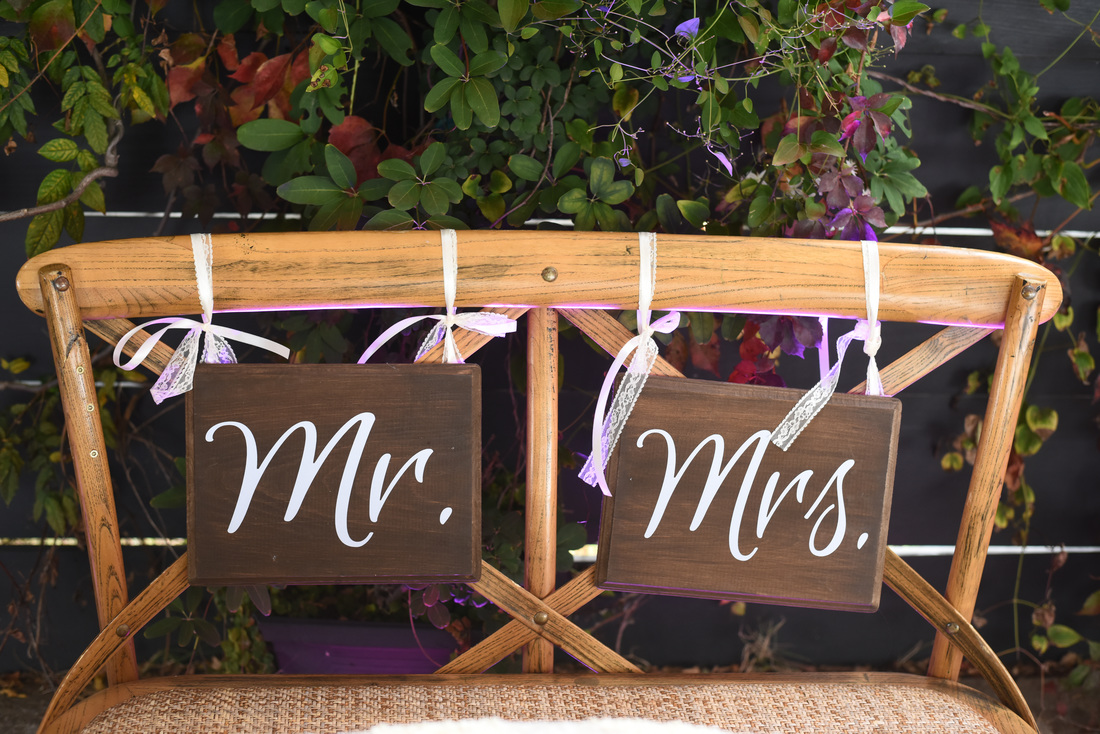
These rectangular wooden pieces were found at Hobby Lobby, stained, vinyl was added, and then they were finished with lace ribbon to tie them to the bench.
DIY pieces: Table Number sign, Name Cards, and Custom Brochures for A21 Advocacy.
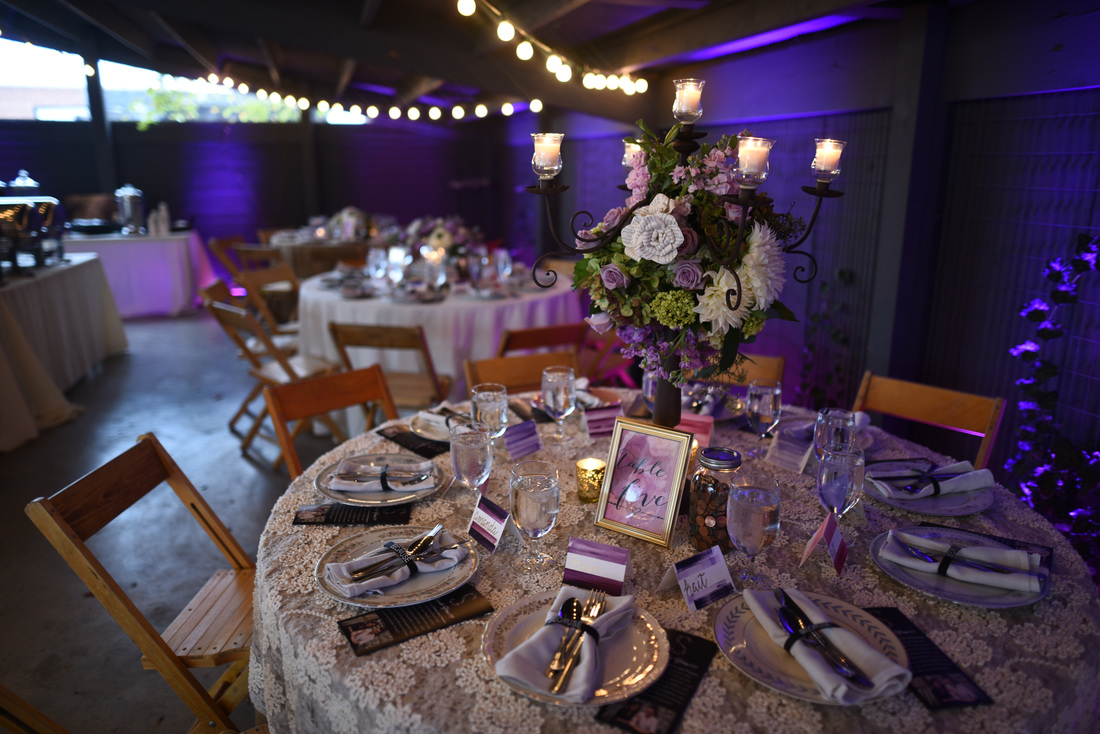
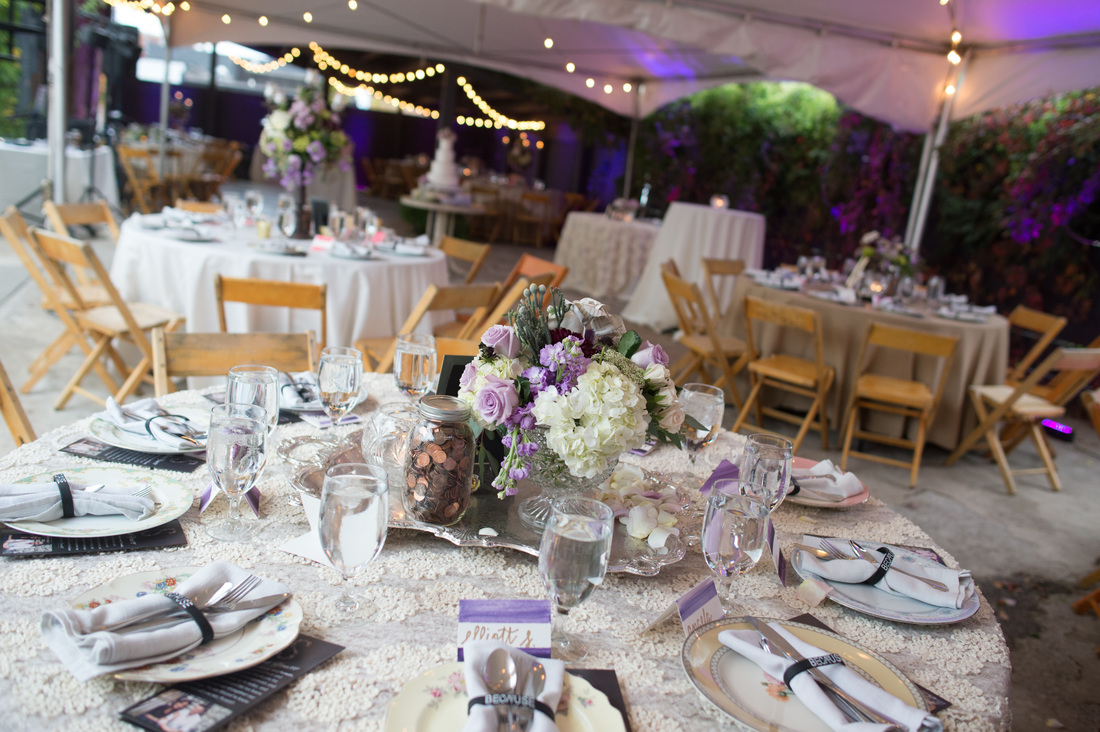
A view of how the homemade pieces tied in with the florals and rented wedding decor (linens, centerpieces, etc.).
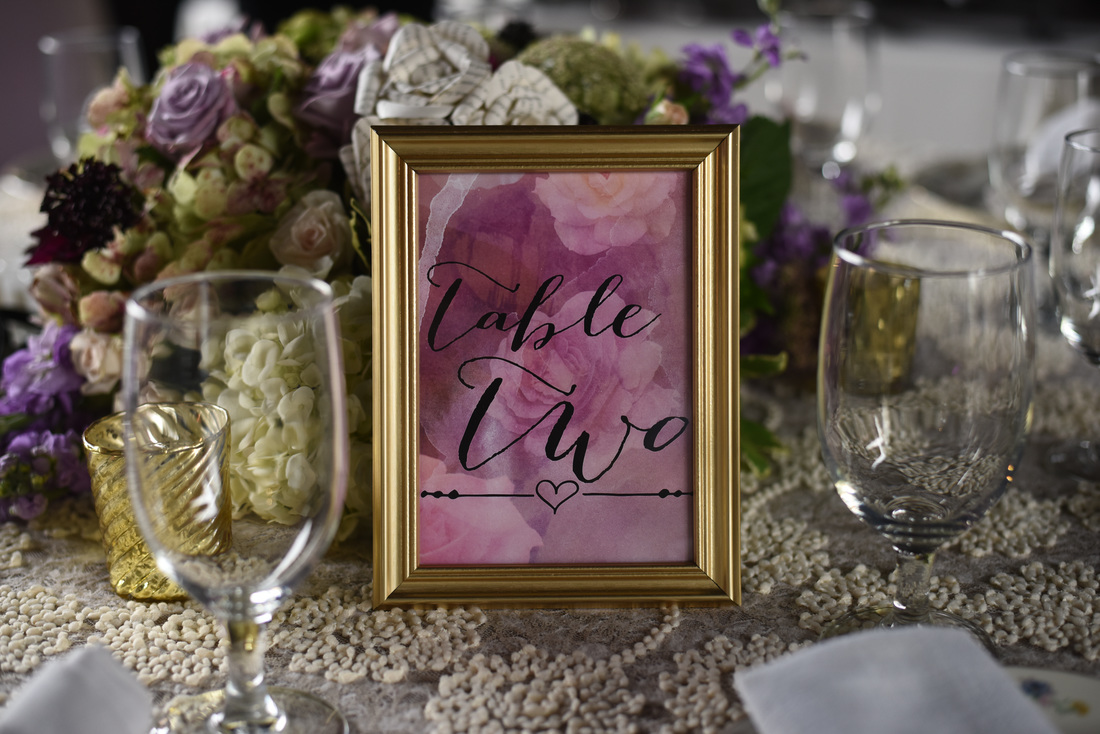
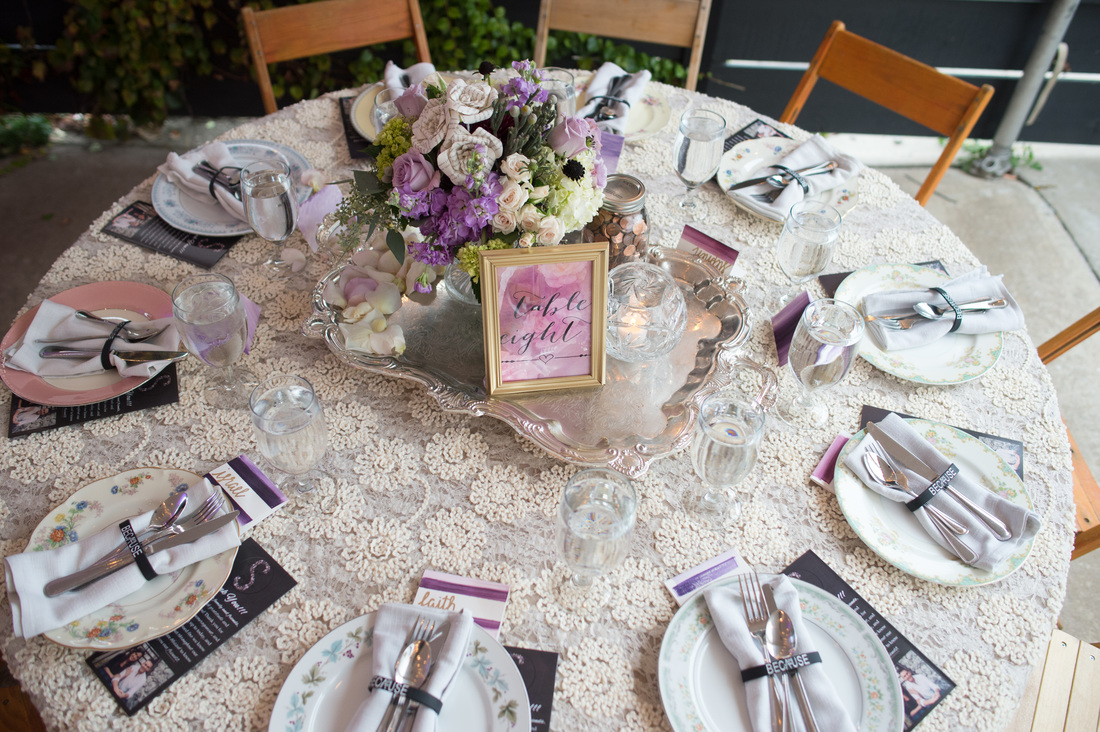
Close up of DIY table number signs. See below for Etsy store for watercolor rose background.

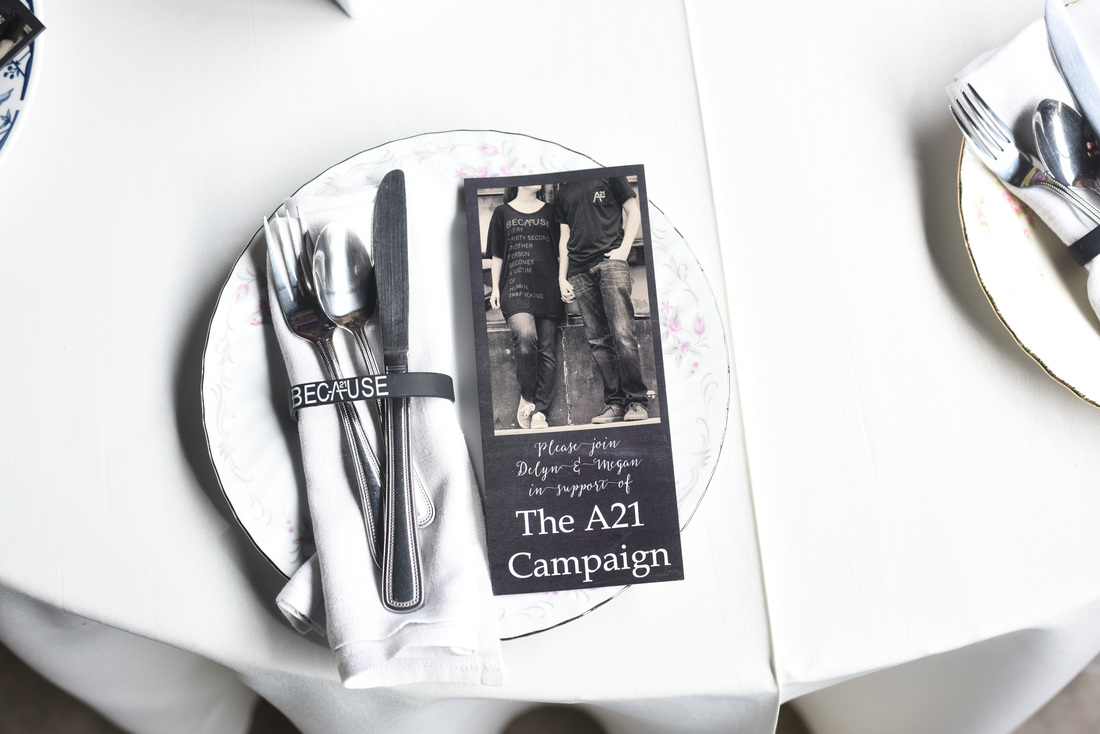
Close up of A21 brochures with information about non-profit, why we want to raise awareness for this cause, and a thank you to our guests.

Reason #100 why I LOVE these signs... they made for such an adorable backdrop for photos. Glad we got a photo with this couple!
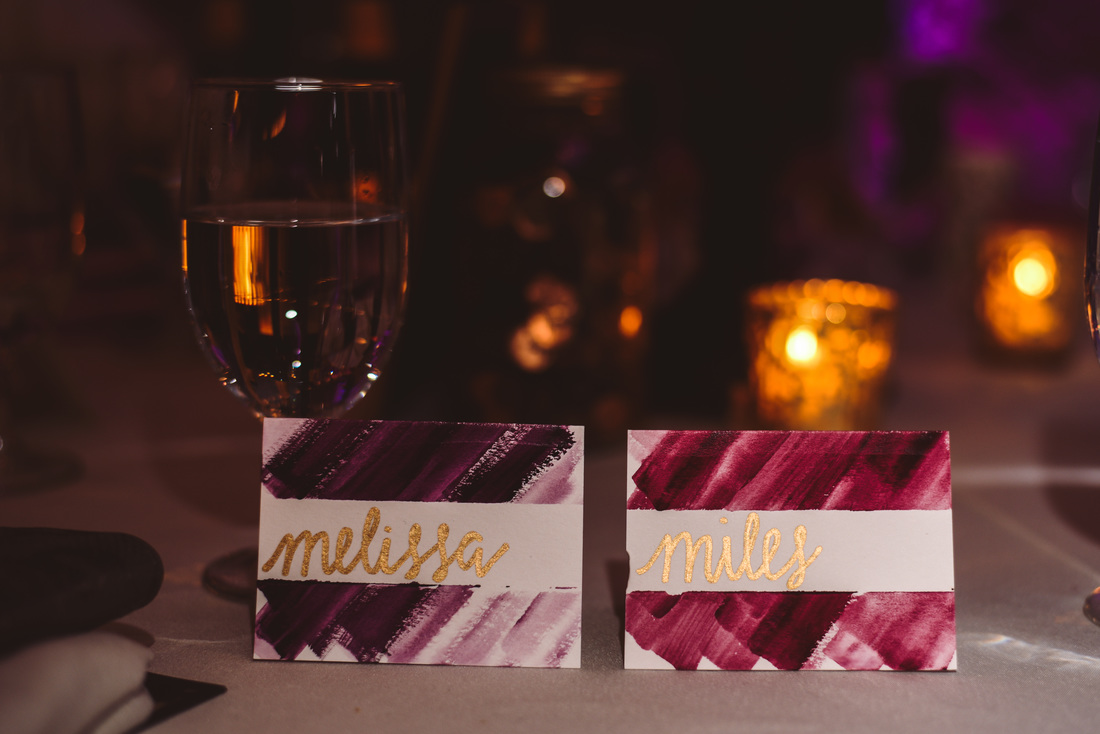
Close up of the watercolor place cards.
Another homemade sign :)
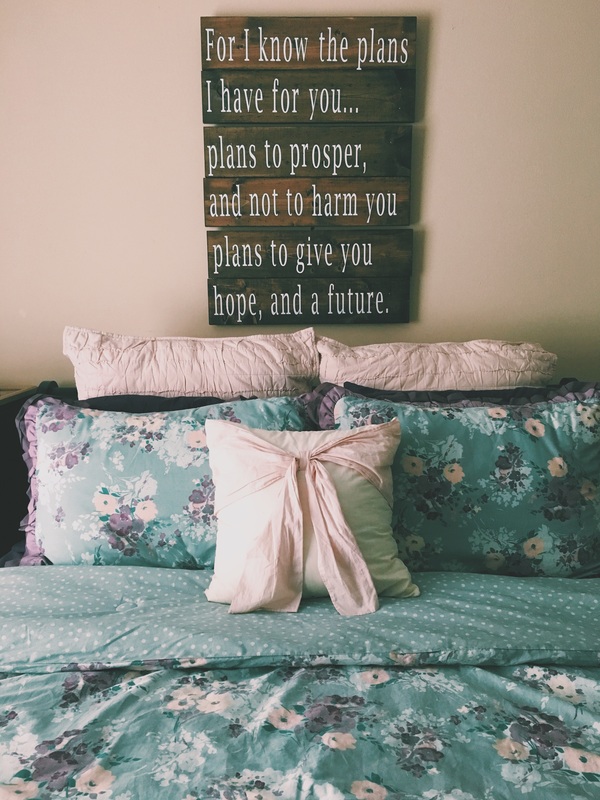
Here's a picture of how we repurposed the signs AFTER the wedding. They are hanging in our guest bedroom, and are so special to me!
FIRST DIY Bride: SIGNS Galore
There are so many different ways I could take this blog. But because I want to focus on projects that EVERYONE can do, I am going to give a brief overview on the projects that require specialty equipment, and spend more time on the projects that require more basic supplies and can be carried out by an entry level crafter. For the Oversized Letters Tutorial, go ahead and scroll to the bottom of this post!! Regarding the other projects: I can't claim credit for all these ideas, so you'll find links and videos I used as inspiration.
Wood Signs
The signs spotlighted in the first photo are made from wood bought from a local hardware store. It is amazing how CHEAP you can make your own signs! Instead of buying the more expensive precut signs from stores like Hobby Lobby or Michaels, go straight to the lumber section of your local hardware store like Lowes or Home Depot. The majority of the signs are cut from large sheets of thinner wood (I'll generally use a 2'x4' sanded plywood board or something similar). They are ~$10-12/board, and you can get them cut to the sizes you need. I always go in with a sketch of what sizes I will need to get the most for my money-- generally I'll ask for (4) 1'x1x pieces and (2) 1'x2' pieces. After purchasing, I simply sand the sides and then stain the wood. The KEY to a cohesive design scheme is to to choose one wood stain you will use throughout the decor... this saves money (a small $7 bucket goes a long way) and looks really polished. Here's a link to my favorite wood stain, as seen in all photos above. I've noticed that thicker pieces of wood actually stain much prettier than thinner pieces. However, the thicker pieces are generally narrow and must be nailed to support beams to create larger sizes (see "The Stirewalts" sign above).
I use my Silhouette Cameo Vinyl Cutting Machine to design and cut the vinyl that transfers onto the wood. If you do not have a Silhouette (or Cricket), see if you can freehand paint your own signs with faux calligraphy! Every girl has a friend with great handwriting. Enlist her! This will save you money; personalized signs and wedding signs on Etsy are generally sold for a premium! But for a fraction of the cost, buying & staining wood and adding lettering is an amazing alternative. For serious crafters, a vinyl cutting machine is an amazing investment. I LOVE my Cameo.
I use my Silhouette Cameo Vinyl Cutting Machine to design and cut the vinyl that transfers onto the wood. If you do not have a Silhouette (or Cricket), see if you can freehand paint your own signs with faux calligraphy! Every girl has a friend with great handwriting. Enlist her! This will save you money; personalized signs and wedding signs on Etsy are generally sold for a premium! But for a fraction of the cost, buying & staining wood and adding lettering is an amazing alternative. For serious crafters, a vinyl cutting machine is an amazing investment. I LOVE my Cameo.
Wood Photo Transfers
This is one of my favorite projects. To save some time, I am going to simply share a link (<-- Click Here) that explains the process (video AND written instructions). I'll be honest.. it can be quite a pain for larger prints (requires some serious time and patience) but the result is beautiful. Similar to the wood signs, I have noticed that thicker pieces of wood will result in better transfers. The thinnest, cheapest pieces might seem like a good option, but your photos are more likely to chip and lose the integrity of the piece.
These are not only a great option because of the low cost of the supplies (essentially paper, wood, gel medium, and paint brush) but the fact that you don't have to pay for frames is an added bonus. I loved frame photos, but there is something very personal about having wood transfers.
Sidenote: I created a few wood transfers for a friend's wedding by obtaining HIGH RESOLUTION files from her fiancé, adding wording in photoshop (ex. Their last name or a scripture), and then transferring. Later I found out that the photographer who took the engagement photos saw the wood transfers displayed at their wedding and thought they were done by a professional. If that's not an endorsement that these can be super impressive, I don't know what is. It's worth a try-- give it a shot!
Table Number Frames
The possibilities are endless here! You can create all sorts of designs freehand , with a machine, or with design software like Photoshop to frame as your table numbers. I opted to design mine in photoshop, with a Watercolor Rose Design background I purchased on Etsy and then printed the final design on cardstock. I purchased the 5x7 gold frames from the dollar store, and the displayed beautifully.
Watercolor Name Cards
I watched a few tutorials before developing my own strategy for the watercolor place cards. This tutorial shows some different techniques. After painting your cards, you can simply handwrite or use calligraphy to add your guests names.
Oversized Letters Tutorial
Okay so this was one of my favorite projects, because I dreamed this one up outside of the world of Etsy and Pinterest. We've all seen amazing, large letters but I wanted something that was a very particular size (aka BIG) and something that nobody had seen before. I'll take the most time on this explanation, because I made up my own tutorial as I went along.
Supplies:
-Oversized letters printed on engineering paper (explained below)
-Cardboard Display boards (the type you use for school projects, you'll need one for each letter) or oversized moving boxes
-Double sided rolling tape (buy a value pack, you will need a lot!)
-Enough wrapping paper to cover the front of your letters (Mine was a Kate Spade floral print. Of course it is sold out now, but I found a few other sites with adorable prints: Papyrus and Paper Source)
-Box cutter
-Scissors
-Pen
-Paint (for back of letters)
-Foam paint brush

- Design (with help) and print your letters- Learn from my mistake: instead of designing your own letters, simply choose a FONT you like, and find a store that can help you design the letters to print on engineering paper (I went to OfficeMax). I originally designed my own and even with a design-savy husband, the files weren't large enough for how big I wanted them printed-- they were super pixelated. Luckily, the awesome employee at the printing service helped me recreate the letters using his software meant for large printing capability (for a small fee... maybe $2). Tell them what you want. Ex: "I am hoping to print an outline of the letters "l,o,v, and e" that are about 2 feet tall." People can better help you when they know what you are trying to do!
- Cut out each letter- Using regular scissors, cut around the letters, cutting out any interior sections as well. Ex. the inside of the "O". Be very careful when cutting to ensure you are creating the most accurate version of the letter.
- Trace your letters onto cardboard- Each of my letters fit into the middle portion of a three fold display board. I planned this on purpose to maximize the size of the final product. Again, trace your letters as accurately as possible. The success of your final product will be based on your attention to detail.
- Cut out the cardboard- Before cutting, I would suggest putting down some old boxes underneath your project. This will protect against cutting through to the surface you are working on. Using a box cutter, cut out your cardboard letters. This should be a very slow and precise method. If you are under 18, do not attempt using box cutters without an adult's supervision-- these are very dangerous and sharp tools. Use common sense and safety when cutting with box cutters-- cut away from your body at all times, and be sure to retract the blade immediately after use.
- Trace your cardboard cutouts onto wrapping paper- Picking out a wrapping paper was my favorite part-- this gives you so much creative freedom. I found a Kate Spade wrapping paper and bought 2 rolls because I wasn't sure how much I would need. I used 1.5 rolls, but this will depend on the size of the letters and the size of the roll. See the materials section for suggestions on where to purchase fun prints. To begin, take your wrapping paper, and place it PRINT SIDE DOWN on a hard, flat surface like a table or wood/tiled floor. I do not recommend tracing on carpet. Place your cardboard letter RIGHT SIDE DOWN on top of the wrapping paper. Trace around each letter. Then, remove the cardboard and cut your wrapping paper outlines with regular scissors. Use caution when moving your paper letters, as these will be flimsy and can wrinkle/tear easily.
- Paint the back of your cutout- I didn't want an ugly backside to my letters, so i used a cheap chalkboard paint found in the paint section at Hobbly Lobby (a small tube worked just fine for me). I applied two coats with a foam brush and gave it plenty of time to dry in between coats and after I was finished. The next step requires flipping the cardboard letters onto their backside, so do not rush the drying process-- it's not worth it.
- Tape the wrapping paper cutouts to the cardboard cutouts- You want to be very precise with this process! I used double sided rolling tape on small sections at a time for best accuracy. For example, start at the top of the letter and work your way down. There is little room to fix mistakes here, and the best advice I can give is to work slowly.
- Display your letters- You worked hard for this project, so make sure you keep it stored in a safe place until you are ready to display it for all to see!!
I'd love to see your finished project, so please feel free to send me a photo or tag me on Instagram (@graceunfiltered)!
 RSS Feed